CA Log Viewer を 初回起動 → 取得 → 分析 → レポート の 4 ステップで使い始めるためのガイドです。Microsoft Graph 経由で Entra ID のサインインログを取得し、条件付きアクセス関連項目を読み解いて HTML レポートとして出力するまでを通します。
目次
Step 1. 初回起動と同意
1-1. インストール
- Microsoft Store からインストール (Microsoft Store で入手)
- 初回起動時は Windows 10 / 11 が必須。.NET 8 ランタイムは MSIX に同梱
[スクリーンショット: Microsoft Store の製品ページ]
1-2. 利用規約・プライバシー方針への同意
- 初回起動時に利用規約・プライバシー方針への同意画面が表示されます (今後のアップデートで提供予定)
- 利用規約 と プライバシーポリシー を読んで「同意する」をクリック
- 同意状態はローカルに保存され、次回以降は表示されません
同意は再表示できます (設定タブ → 「同意状態をリセット」)。
1-3. 言語選択
- 初回起動時は OS の言語設定に従って 日本語 / English が自動選択されます
- 後から設定タブの「UI 言語」で切り替え可能 (即時反映)
- サインインログのデモデータは選択言語にあわせて切り替わります
Step 2. Entra アプリ登録 → サインインログ取得
2-1. Entra アプリ登録 (初回のみ)
- Microsoft Entra 管理センター → 「アプリの登録」 → 「新規登録」
- 名前: 任意 (例:
CA Log Viewer)、サポートされるアカウント: 「自分の組織のみ」 - リダイレクト URI:
パブリック クライアント / ネイティブを選択しhttp://localhostを登録 - 登録後の「アプリケーション (クライアント) ID」と「ディレクトリ (テナント) ID」を控える
2-2. Microsoft Graph 権限の付与
- 登録したアプリ → 「API のアクセス許可」 → 「アクセス許可の追加」
- Microsoft Graph → 委任されたアクセス許可 を選択
- 以下 3 つを追加:
AuditLog.Read.All(サインインログ取得)Policy.Read.ConditionalAccess(CA ポリシー定義取得)User.Read.All(UPN / 表示名解決)
- 「<テナント> に管理者の同意を与えます」をクリック (グローバル管理者権限が必要)
委任認証のため、利用者にも上記スコープが付与されている必要があります。アプリケーション認証 (クライアントシークレット / 証明書) は使用しません。
2-3. アプリで取得
- CA Log Viewer を起動 → 設定タブで「ClientId」「TenantId」を入力 → 保存
- 取得タブの「期間」を選択 (例: 直近 7 日間 / 24 時間 / カスタム)
- 「取得開始」ボタン → ブラウザで MSAL 認証 (初回のみ同意)
- 取得完了後、サインインログ件数 / CA ポリシー件数 / 取得時刻が表示されます
大規模テナントでは数千件取得まで数分かかります。進捗バーで確認できます。
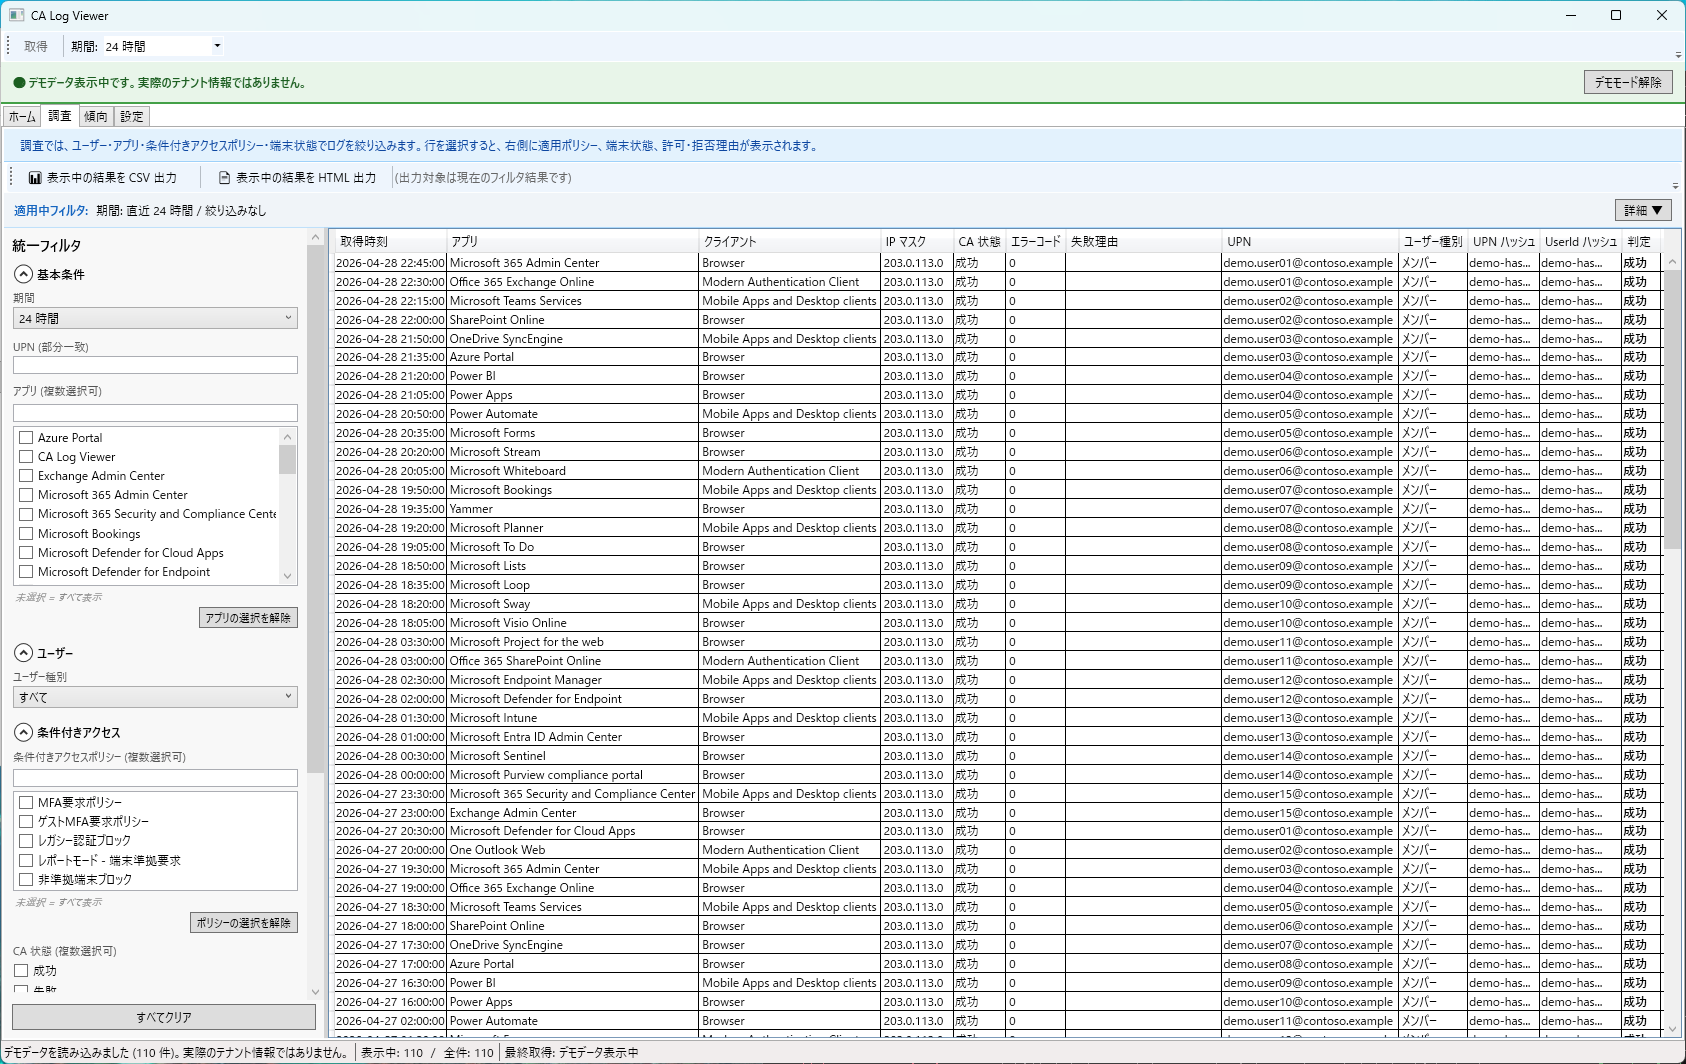
Step 3. 調査タブで分析
3-1. 統一フィルタで絞り込み
調査タブ上部の統一フィルタは複数選択 OR 対応です。
- 期間: 直近 24 時間 / 7 日 / 30 日 / カスタム範囲
- ユーザー: UPN / 表示名で絞り込み (部分一致)
- CA 状態: 成功 / 失敗 / 未適用 / レポートモード
- 判定: 許可 / 拒否 / 中断 / 不明
- デバイス: 準拠 / 非準拠 / Hybrid Joined / Unknown
- 特殊条件: リスクサインイン / レガシー認証 / ゲストユーザー など
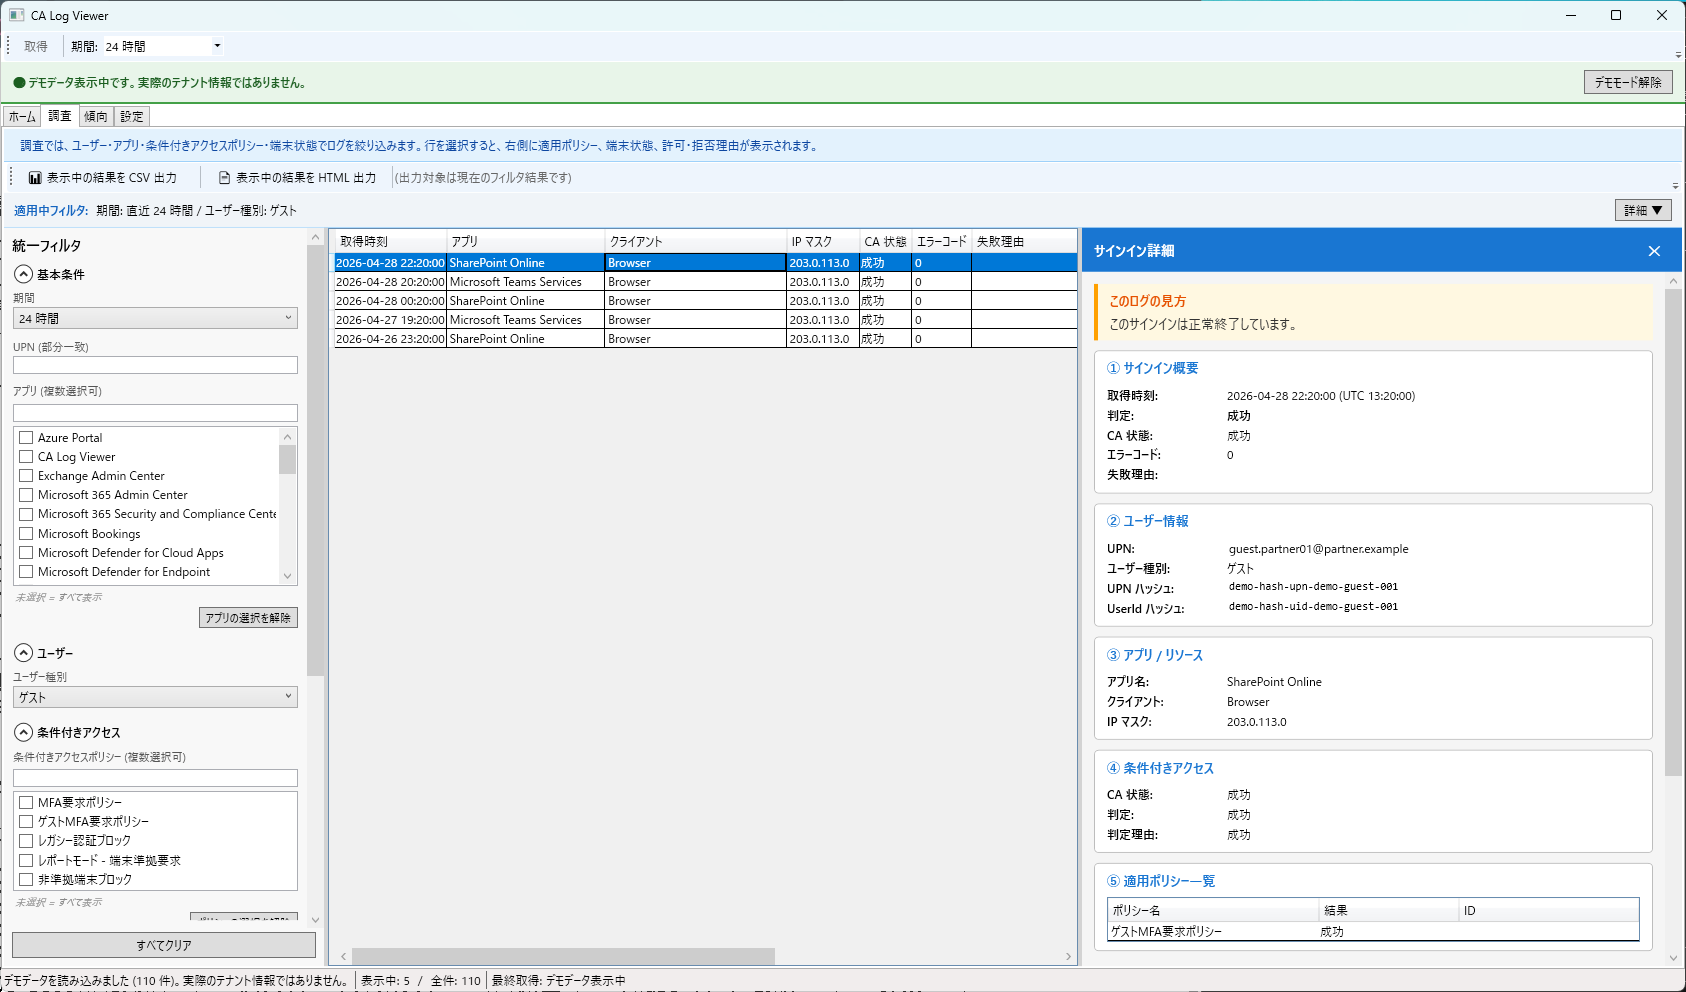
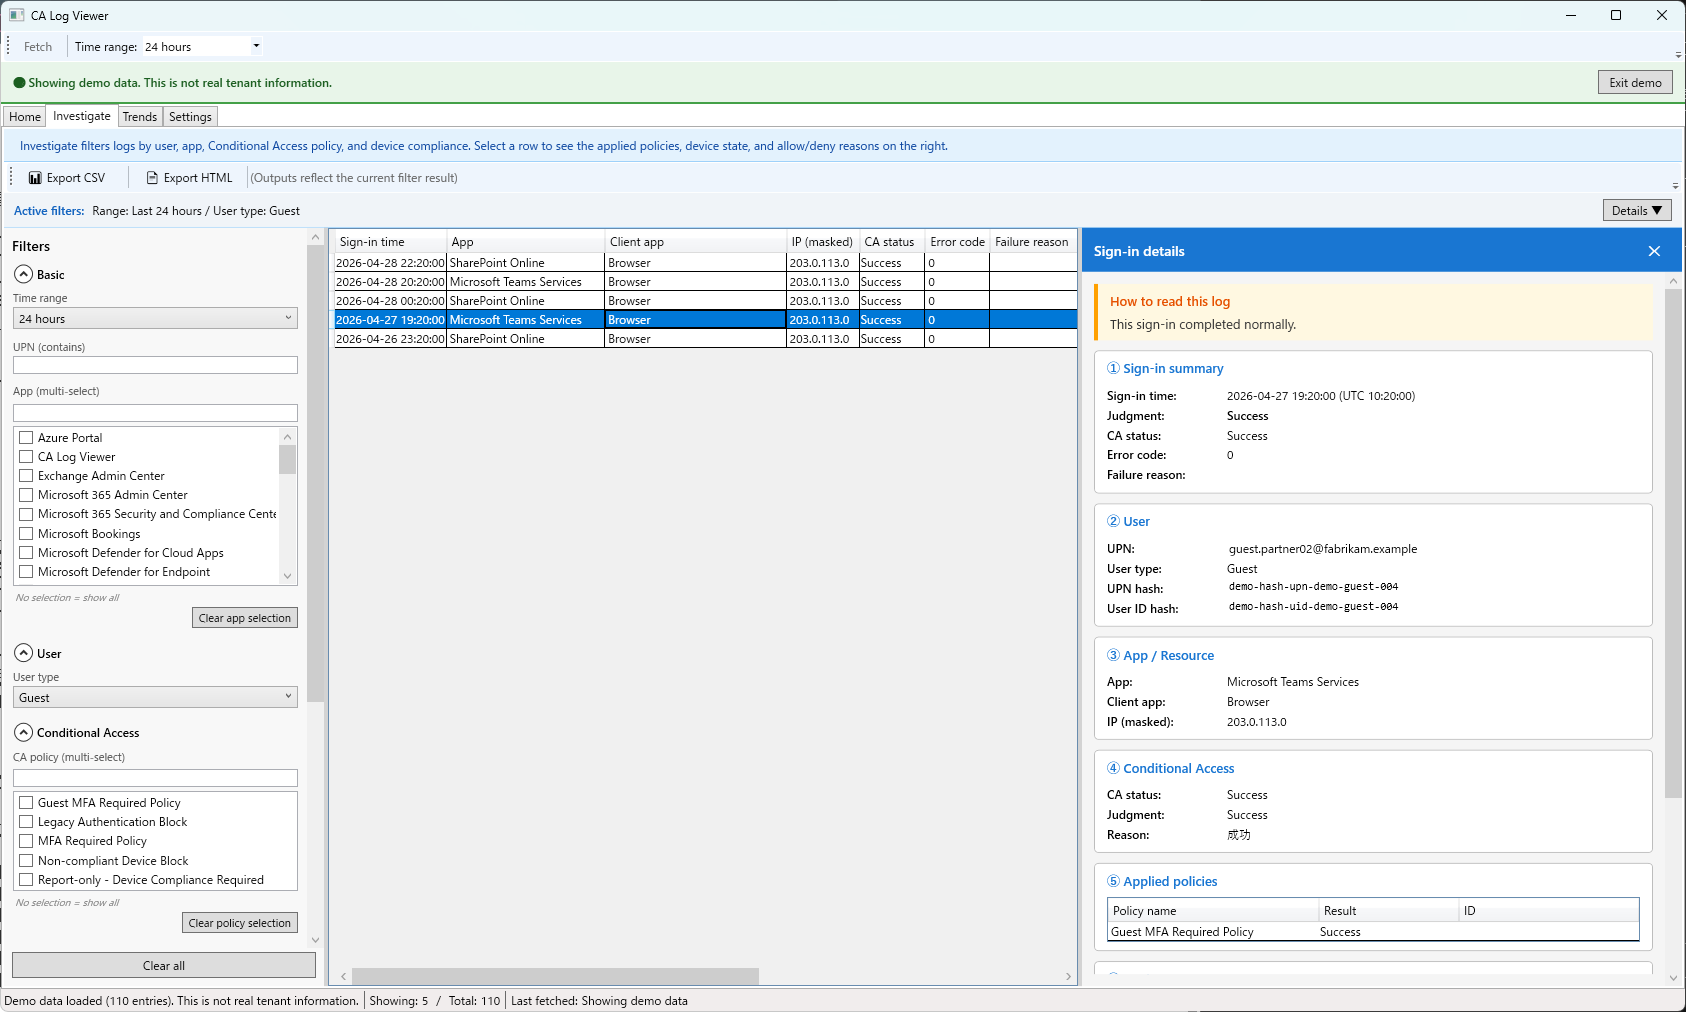
3-2. 詳細パネルで 7 ブロック + 結論を確認
一覧から行を選択すると右側に詳細スライドインパネルが開きます。
- 結論: 6 段階優先順位 (ポリシーによる拒否 / MFA 必須なのに省略 / リスクベース拒否 / 準拠端末必須 / 不審なレガシー認証 / 許可) で自動判定
- サインイン概要: 日時 / IP / 場所 / クライアントアプリ / 認証要件
- ユーザー: UPN / 表示名 / リスクレベル / ユーザータイプ
- アプリ: アプリ名 / アプリ ID / リソース
- 条件付きアクセス: CA 評価結果 / 評価対象ポリシー数 / 適用ポリシー数
- 適用ポリシー一覧: ポリシー名 / 結果 / 必要なコントロール (MFA / 準拠端末 など)
- 端末準拠状態: 端末 ID / OS / 準拠状態 / 管理状態
最下部に「許可・拒否理由」をまとめて表示します。
3-3. 傾向タブで異常検知 / 集計を確認
- 異常検知: 短時間多発失敗 / 地理的に離れた連続サインイン / レガシー認証急増 などのアラートを表示
- アプリ別集計: アプリ単位のサインイン件数 / 許可 / 拒否 比率
Step 4. HTML レポート出力
4-1. レポート出力
- 調査タブ上部「Export HTML」ボタン → 現在のフィルタ結果を HTML レポートとして出力
- 保存先を選択 → 出力完了後にブラウザで自動的に開きます
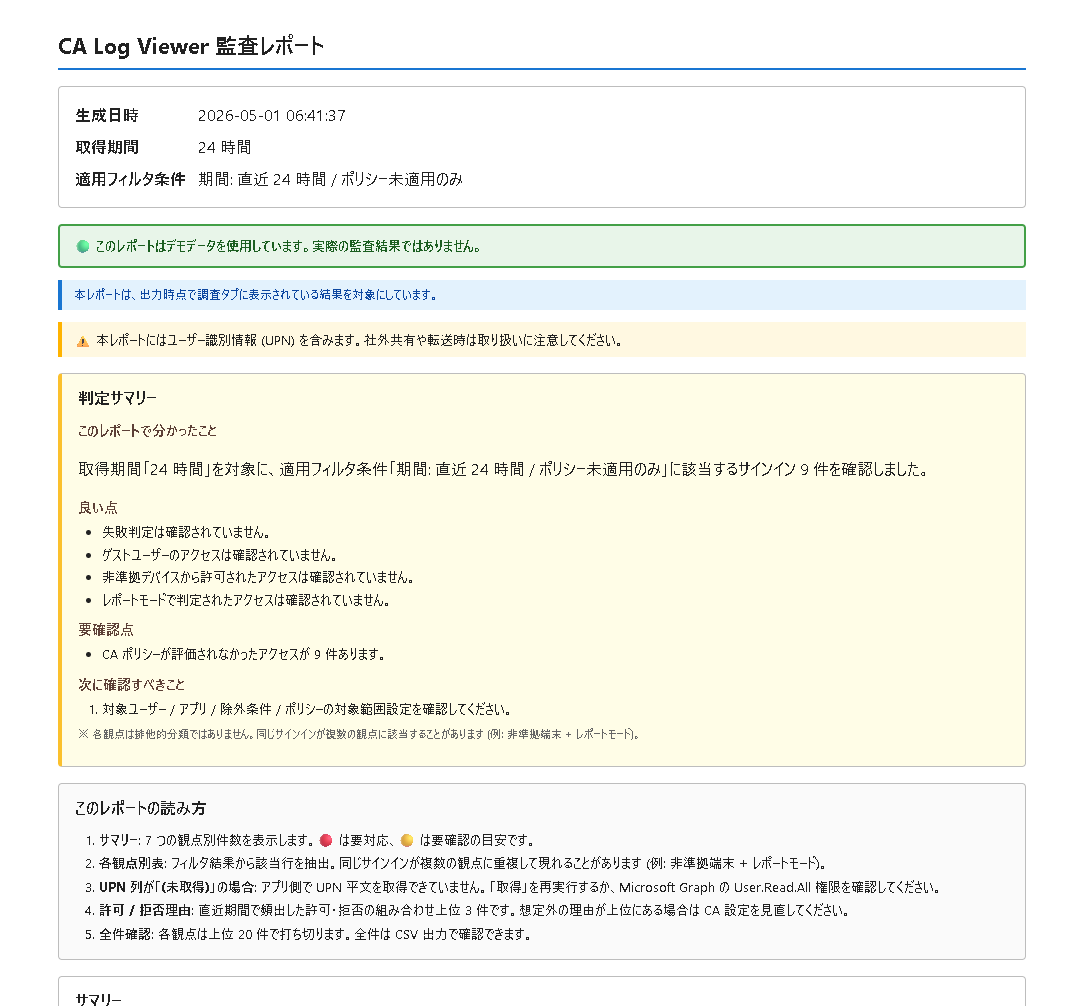
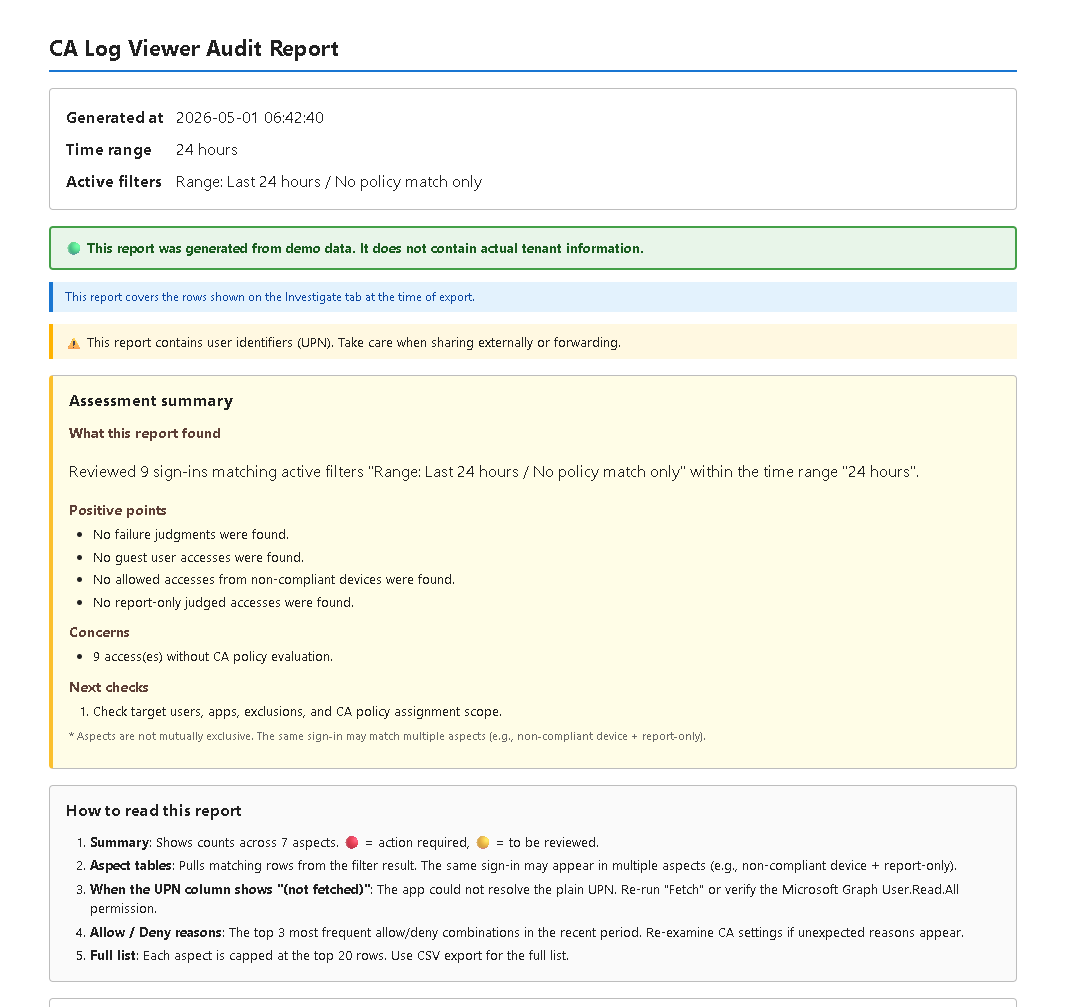
4-2. レポート内容
- サマリー: 期間 / 総件数 / 許可 / 拒否 件数 / 主要 CA 状態の比率
- 判定サマリー: 結論 6 段階の件数分布
- 3 軸集約表: ユーザー別 / アプリ別 / ポリシー別 (それぞれ上位 20 + 「その他」集約)
- 観点別表: CA 状態 / 判定 / デバイス / 特殊条件
- 許可・拒否理由: 個別サインインの許可・拒否理由を一覧化
レポートには UPN / IP / アプリ名が含まれます。外部共有時は取り扱い (PII) に注意してください。
補足: デモモード / 言語切替 / CSV 出力
デモモード
- 実テナントなしで操作感を試すための機能 (110 件 / 6 シナリオ)
- UPN は
*.exampleドメイン、IP は RFC 5737 で固定 - Microsoft Store 配布版には含まれません (社内検証ビルド限定)
言語切替
- 設定タブの「UI 言語」で 日本語 / English を切替
- 切替は即時反映 (再起動不要)
- HTML レポートも UI 言語に追従
CSV 出力
- 調査タブから現在のフィルタ結果を CSV としてエクスポート
- UPN / IP / アプリ名を含むため、外部共有時は PII 取り扱いに注意
This guide walks through CA Log Viewer in four steps: first launch → fetch → analyze → report. You will fetch Entra ID sign-in logs via Microsoft Graph, read Conditional Access related entries, and export an HTML report.
Contents
Step 1. First launch and consent
1-1. Install
- Install from the Microsoft Store (Get it from Microsoft Store)
- Windows 10 / 11 required. The .NET 8 runtime is bundled in the MSIX
[Screenshot: Microsoft Store product page]
1-2. Accept Terms / Privacy
- A consent screen for Terms / Privacy appears on first launch (will be provided in a future update)
- Read Terms of Use and Privacy Policy, then click "Accept"
- The consent state is stored locally and is not shown on subsequent launches
You can re-display consent (Settings tab → "Reset consent state").
1-3. Choose language
- On first launch, Japanese / English is auto-selected based on the OS language
- Switch later from Settings → "UI language" (applied immediately)
- Demo data also follows the selected language
Step 2. Register Entra app → fetch sign-in logs
2-1. Register an Entra app (one-time)
- Microsoft Entra admin center → "App registrations" → "New registration"
- Name: any (e.g.
CA Log Viewer); Supported account types: "My organization only" - Redirect URI: choose
Public client / nativeand registerhttp://localhost - Note the "Application (client) ID" and "Directory (tenant) ID"
2-2. Grant Microsoft Graph permissions
- Registered app → "API permissions" → "Add a permission"
- Microsoft Graph → choose Delegated permissions
- Add the following three:
AuditLog.Read.All(read sign-in logs)Policy.Read.ConditionalAccess(read CA policy definitions)User.Read.All(resolve UPN / display name)
- Click "Grant admin consent for <tenant>" (Global Administrator required)
Delegated authentication is used, so the running user must also have the scopes above. Application authentication (client secret / certificate) is not used.
2-3. Fetch from the app
- Launch CA Log Viewer → Settings tab → enter "ClientId" and "TenantId" → save
- Fetch tab → choose a time range (e.g. last 7 days / 24 hours / custom)
- Click "Start fetch" → MSAL authentication opens in the browser (consent only on first run)
- After fetch, sign-in count / CA policy count / fetch time are displayed
Large tenants may take several minutes to fetch thousands of records. A progress bar is shown.
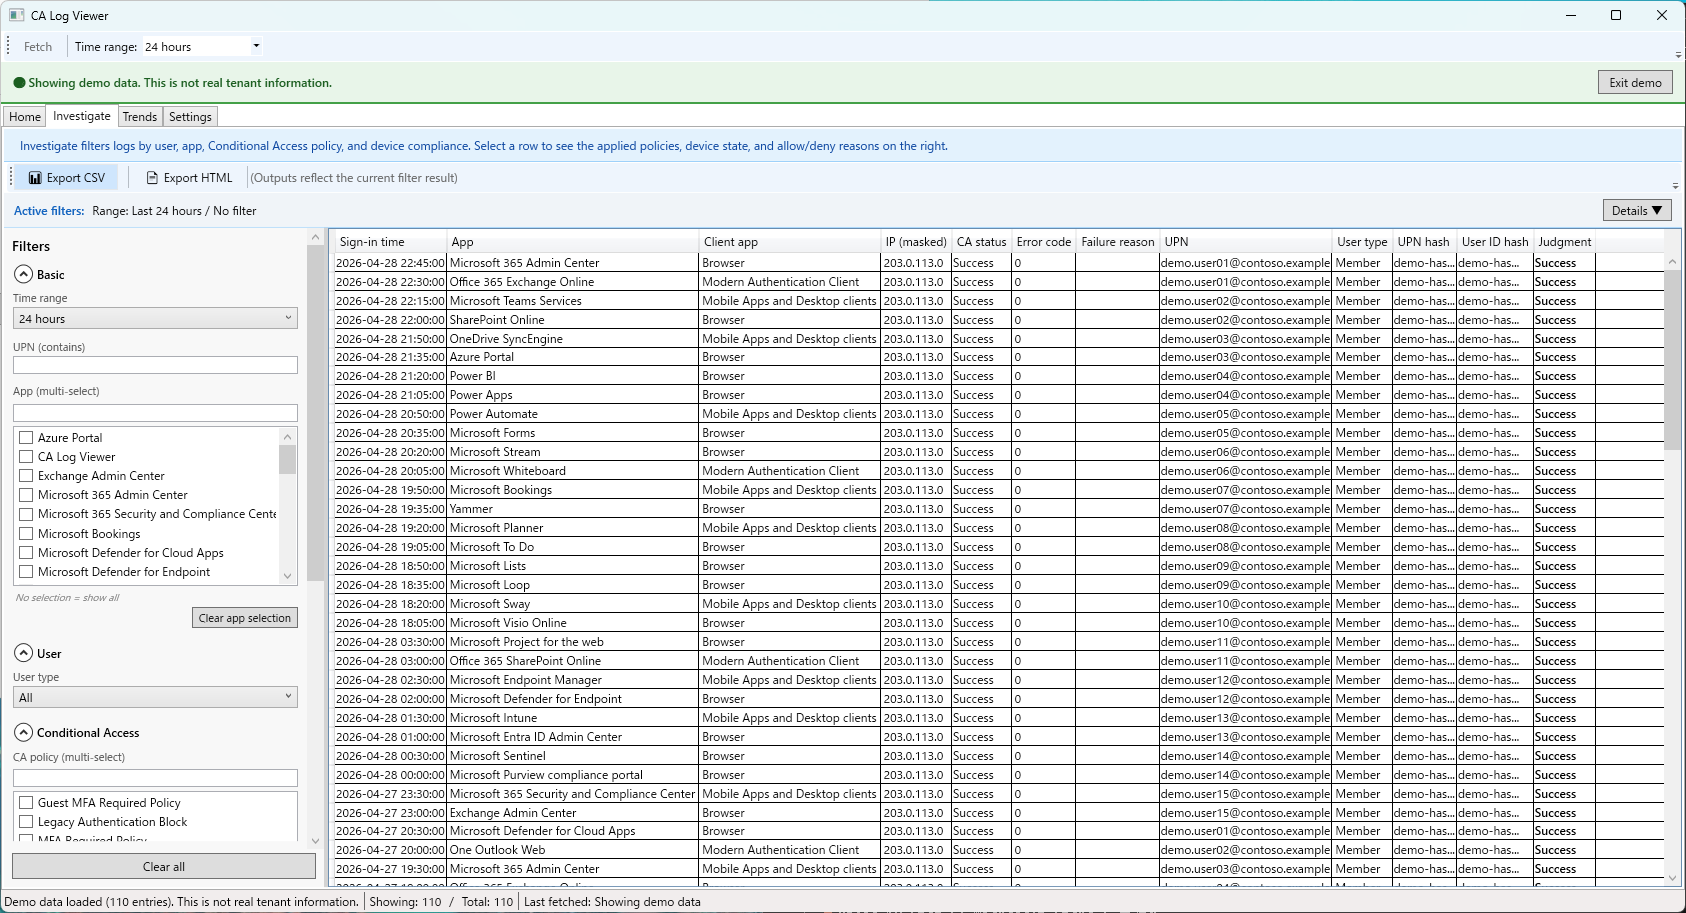
Step 3. Analyze in the Investigate tab
3-1. Filter using the unified filter
The unified filter at the top of the Investigate tab supports multi-select OR.
- Range: last 24h / 7d / 30d / custom
- User: filter by UPN / display name (partial match)
- CA status: Success / Failure / Not applied / Report-only
- Judgment: Allow / Deny / Interrupted / Unknown
- Device: Compliant / Non-compliant / Hybrid Joined / Unknown
- Special: Risky sign-in / Legacy auth / Guest user, etc.
3-2. Detail pane with 7 sections + conclusion
Selecting a row opens a slide-in detail pane on the right.
- Conclusion: auto-classified into 6-tier priority (Block by policy / MFA required but skipped / Risk-based block / Compliant device required / Suspicious legacy auth / Allow)
- Sign-in summary: time / IP / location / client app / auth requirement
- User: UPN / display name / risk level / user type
- App: app name / app ID / resource
- Conditional Access: CA evaluation result / evaluated policies / applied policies
- Applied policies: policy name / result / required controls (MFA / compliant device, etc.)
- Device compliance: device ID / OS / compliant state / managed state
The pane footer shows "Allow & Deny reasons" aggregated.
3-3. Trends tab for anomaly detection / aggregation
- Anomaly detection: short-burst failures / geographically distant consecutive sign-ins / legacy auth surges, etc.
- Per-app aggregation: sign-in count / Allow vs. Deny ratio per app
Step 4. Export HTML report
4-1. Export
- Click "Export HTML" at the top of the Investigate tab → exports the current filter result as an HTML report
- Choose a destination → opens automatically in the browser
4-2. Report contents
- Summary: range / total count / Allow / Deny counts / major CA status ratios
- Assessment: distribution of the 6-tier conclusion
- 3-axis aggregation: by user / by app / by policy (top 20 + "Others")
- Aspect tables: CA status / judgment / device / special
- Allow & Deny reasons: per-sign-in allow/deny reasons listed
Reports include UPN / IP / app name. Be careful with PII when sharing externally.
Notes: Demo mode / language switch / CSV export
Demo mode
- Try the app without a real tenant (110 records / 6 scenarios)
- UPNs use
*.exampledomains; IPs are fixed to RFC 5737 - Excluded from Microsoft Store builds (in-house verification builds only)
Language switch
- Settings tab → "UI language" → switch between Japanese / English
- Applied immediately (no restart required)
- The HTML report also follows the UI language
CSV export
- Export the current filter result as CSV from the Investigate tab
- Includes UPN / IP / app name — handle PII carefully when sharing